In the seemingly modern way with family, friends, exercise, and this blog, it's been too long.
Before Easter we had some more time on the lathes, which enabled me to start and finish my bearing plug and housing, and start my tapered shaft.
The bearing plug was a two part job, the plug first, then the housing. They had to fit into each other perfectly, so precision is necessary. A lot of it relied on knowing exactly how big you'd made your plug, so when you came to make the housing you would know what size to make it.
Next up, the tapered shaft - haven't finished this one, so more will appear later on in the future with this. It's a two part job. First you turn the tapered shaft, then the ring to fit it. Once you have made the ring, you then mallet it onto the tapered shaft, and then turn down the outside diameter of the ring until it matches requirements. I have done the ring too (not shown here), but have yet to put them together and finally turn down the outside diameter. Shouldn't take long to finish that one.
During Easter, I had to work on finishing a project I didn't finish four years ago - mirror polishing a set of alloy wheels. I spent almost a day getting rid of corrosion and pitting on the wheel, and prepping it ready for polishing. Since then, I spent a few hours polishing and it's nearly done now. Once they are finished I won't be able to wait to get them off my hands!
3 complete next to one awaiting completion.
Emerying Stages
Ready to polish
Centre polished - this was the most painful part, as has to be done with felts on the end of a drill spindle.
Progressing...
Should hopefully finish the lot this weekend.
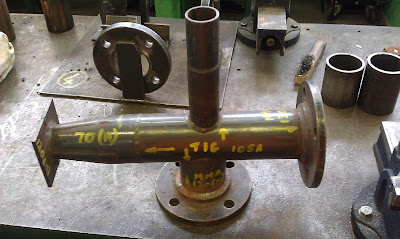
After Easter, we began welding, which has been enjoyable. Here's a few of my practice pieces below. Our final job is to complete a pipework project/exercise which I've shown a photo of below. It involves quite a bit of cutting, filing and welding (of differing types).
One of our instructors demonstrating a lap weld (gas welding)
Gas Welding Lap Joint on 1.6mm steel plate
Gas welding butt join on 1.6mm steel plate
Tig weld - Fillet joint on 3mm steel plate
MMA (Manual Metal Arc) Welding - Butt join on 6mm steel plate. Used weave technique
MMA Welding - Fillet weld on 6mm steel plate. Used multi-run technique: Three runs layered in sequence. On left hand side, a slag inclusion from one of the first two welds prevented me from controlling the molten metal pool, so it deviated off course.
MIG (Metal inert gas) - Fillet weld on 6mm steel plate.
Example workpiece - we have to complete one of these. The end plate (on the left) is our butt weld that we did using a weave technique with MMA welding
We had to learn to use the gas cutting torch before we could begin our pipework.
Using gas cutting torch to cut v notches out of pipe. We then used the vice to compress the ends, forming a converging nozzle.
V notches cut out, ready to go in the vice.
I've just welded the four seams on the reducer nozzle, and then welded my MMA butt plate (from previously) to it. I have tomorrow to attempt to finish the rest of the pipework - hopefully I will manage it before the end of the day...


